
Before and After: Erin and Bill's Cool Blue Kitchen
Erin and Bill are past clients of Mega Remodel where we did a kitchen remodel for them about 5 years ago. After their growing family out-grew their Edina rambler, they made a move to Minnetonka. They bought a spacious two-story home on a cul-de-sac which was perfect for the kids, however the 1990’s designed kitchen didn’t work well for them. So they called us back to undergo another project!
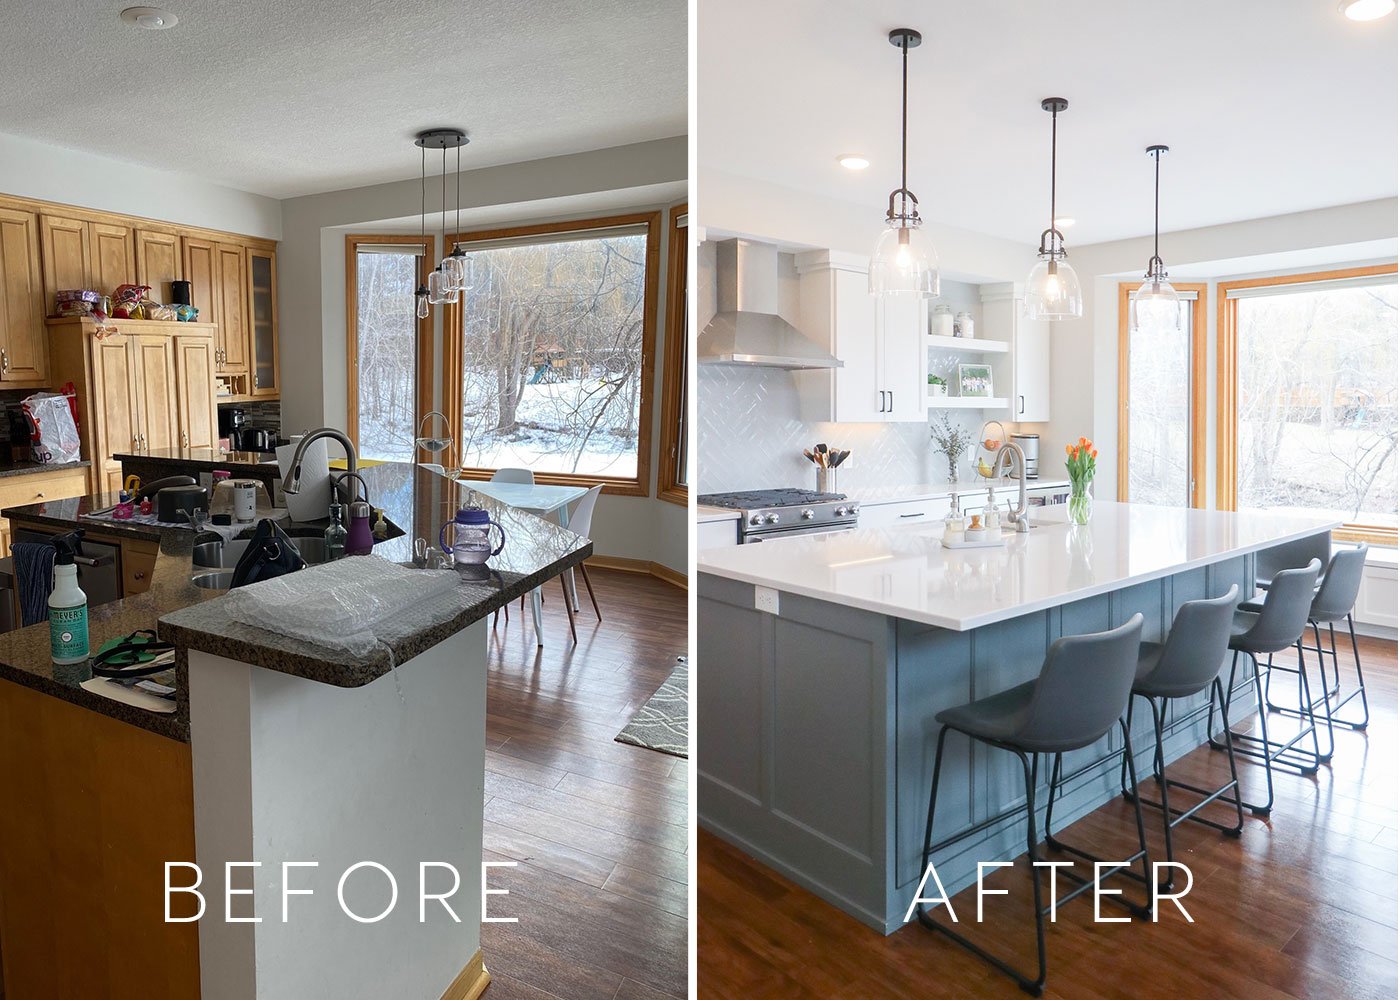
Before
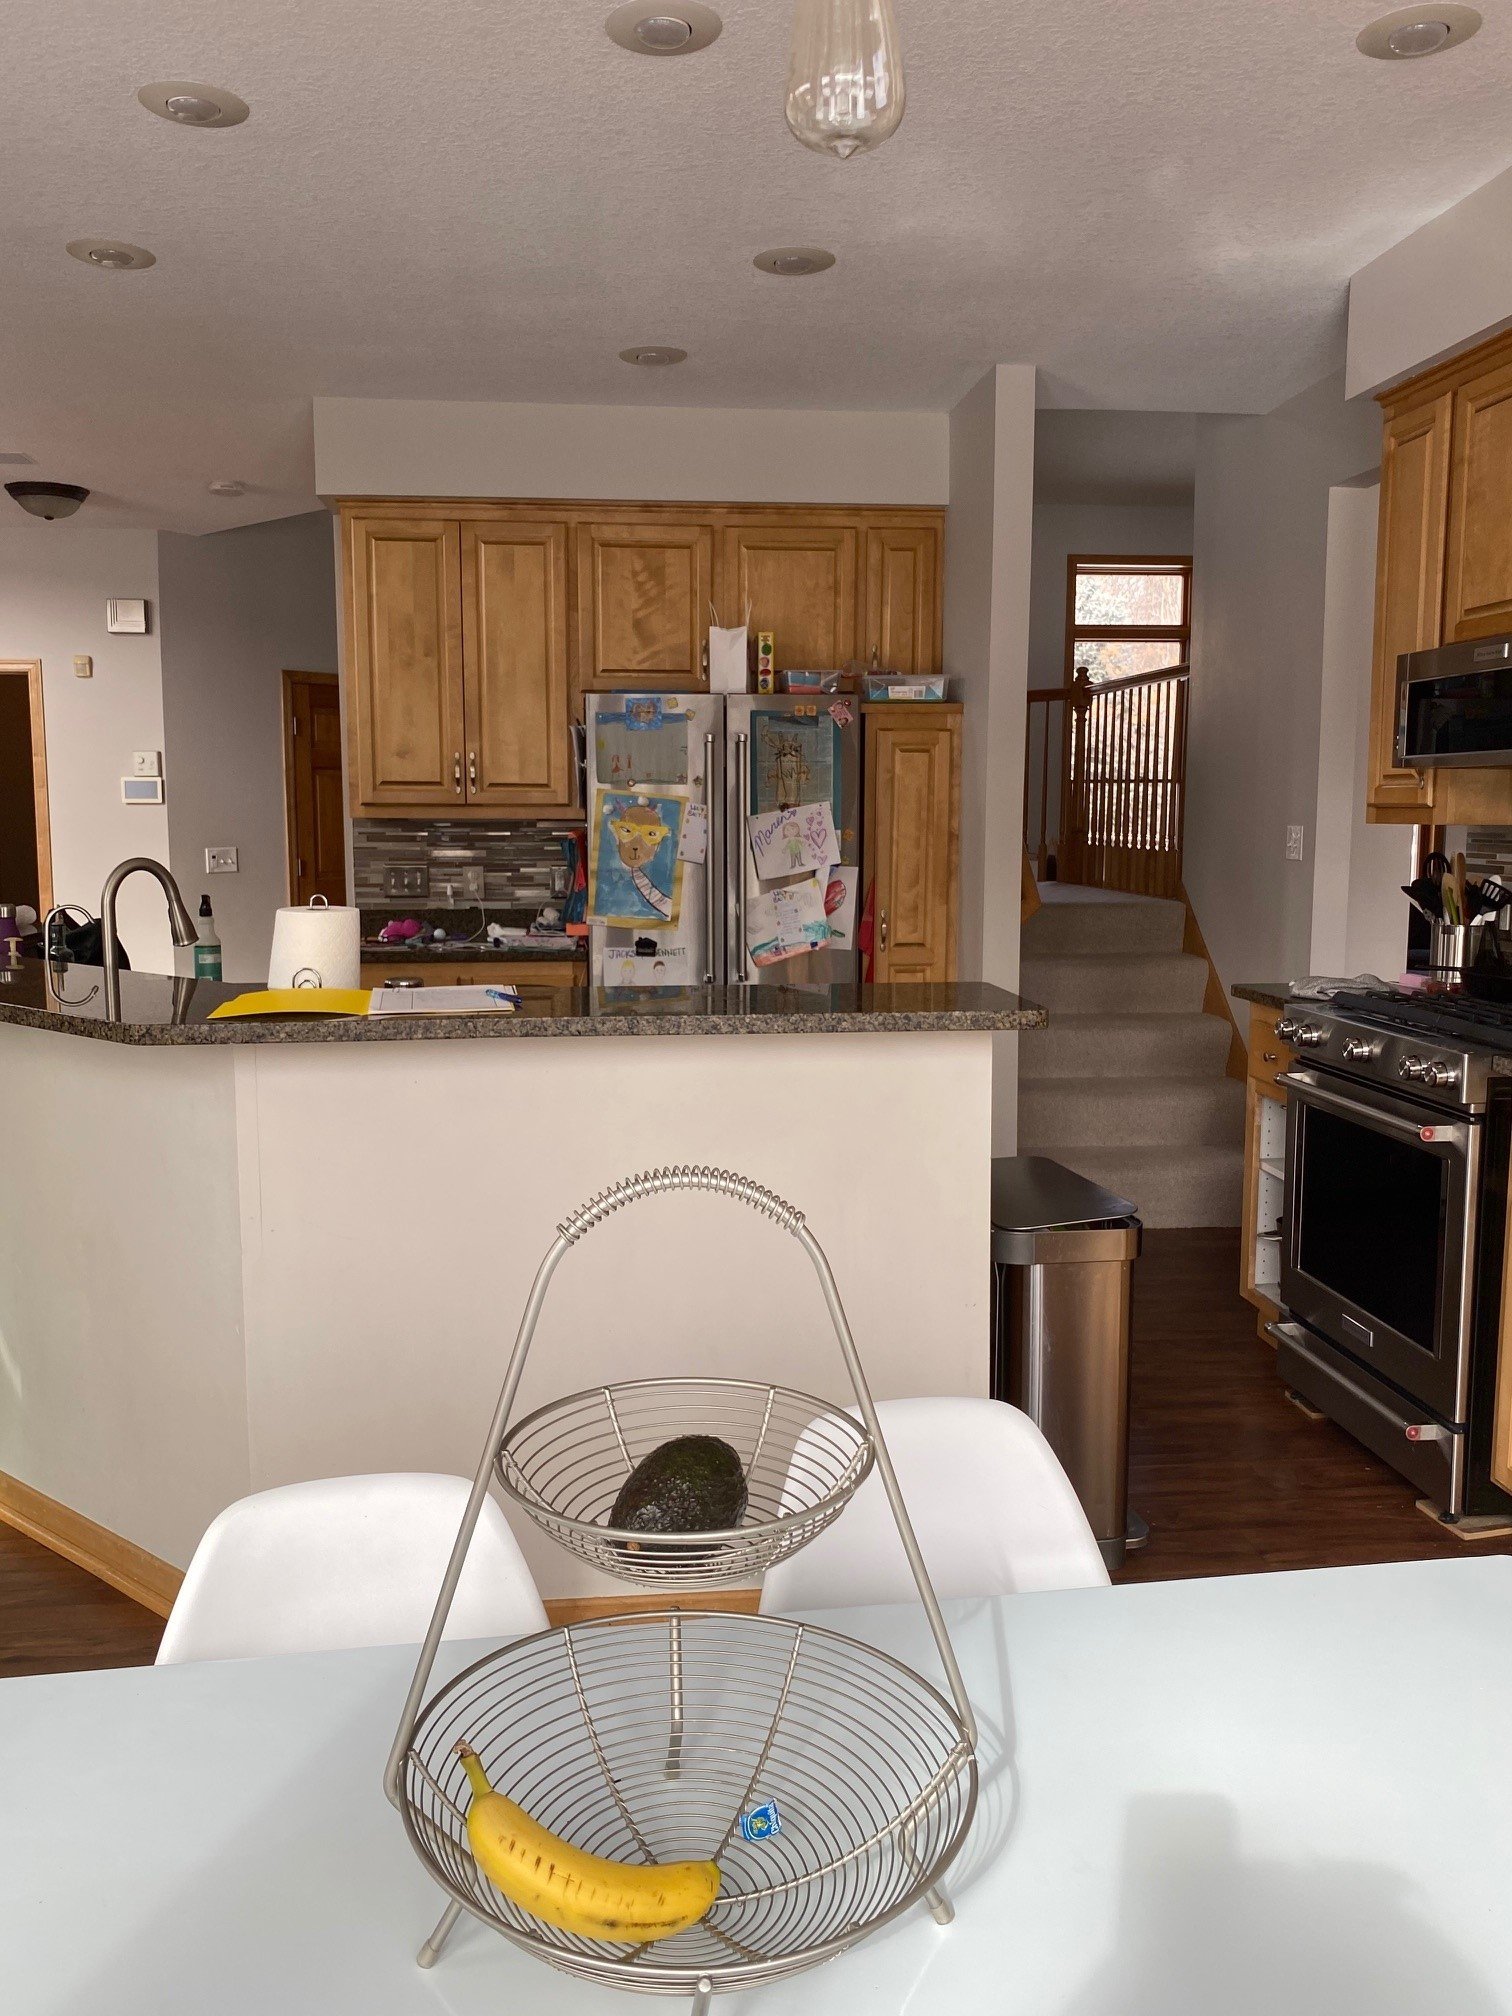
The layout of their original kitchen was divided into two distinct areas: a two-tiered angled island and a small dining area. These separate spaces made the kitchen feel small and crowded, especially with the heavy wall of maple cabinetry. With already a separate dining room just behind this wall of cabinetry, the couple felt like they could make use of increasing room for kitchen prep and eliminating the need for a second table.

Kitchen before

Kitchen before; Looking at an angle from the living room
Kitchen before; Looking at an angle from the window
The large windows bring in a lot of natural light to the kitchen. However, one of the structures that prevented light from shining into the left side was the high top island. In addition, the raised counter bar was not ideal seating for their 3 small children. The original design really lacked prep counter space and the right kind of storage for them.
To modernize the design and capture their style, they will need all new cabinetry, countertops, lighting, tile backsplash & appliances.
Erin’s enthusiasm for her new kitchen was evident throughout the entire planning process. She even took it upon herself to make a collage of the final selections to make sure the design was exactly what she envisioned.
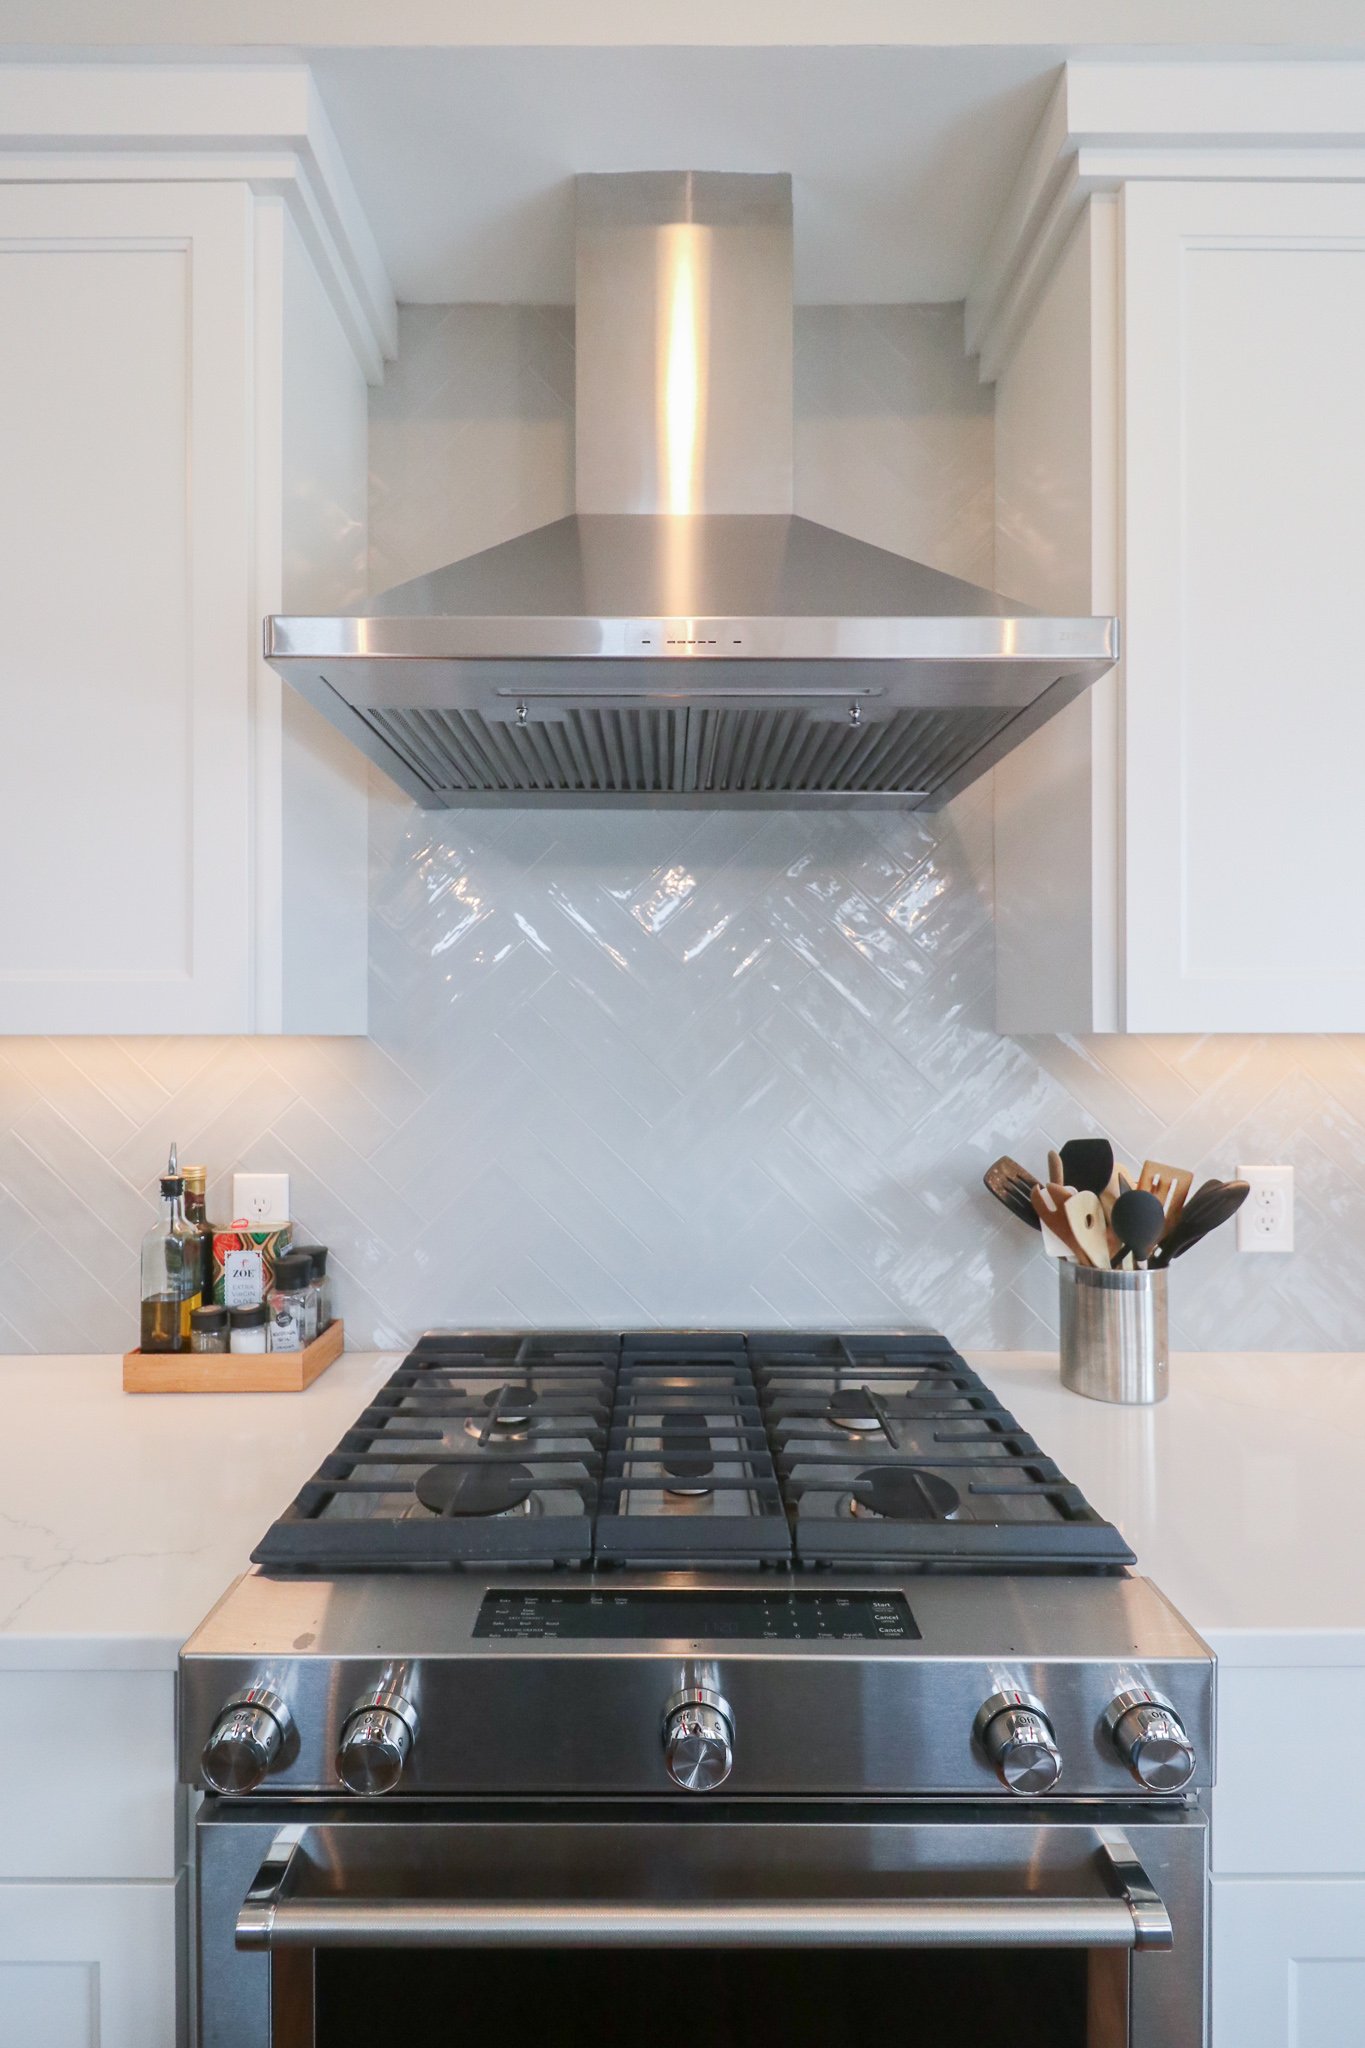
We offer design consultation throughout; creating a cabinetry layout that used every inch of space and also doubled their counter prep space! The colors that were chosen were subtle and we kept in mind that we wanted to make it cohesive with the space that wasn’t being remodeled. With one large wall for tile backsplash, we chose a 10.5” x 2.5” subway tile and laid it in a double stacked herringbone pattern. This is the focal point wall and can be enjoyed from the island seating and the adjacent great room.

Kitchen inspiration
After

When designing a kitchen, we like to get to know our families and what works for their lifestyle. For Erin and Bill, it was important that the kitchen island would be a gathering spot for family cooking and enjoying each other’s company. We designed a cabinet layout that is much more functional and is grounded by a spacious island that will seat their family of 5.
The new island not only looks great, but it doubles as hidden storage to collect tabletop appliances and other gadgets that would normally take up room on the countertops. With all of these things out of the way, a clutter-free kitchen is always Erin’s goal.


We worked with our electrician to move the wiring above the island, and installed 3 globe pendant lights. The matte black finish provides a fine contrast to the light colors.

To make the orientation of the windows seem more purposeful, we built a custom bay window bench that has additional room for storage. This spot will be a great place to sit and enjoy the outdoor view, or mingle with the rest of the guests seated at the island.

Kitchen before

Kitchen after

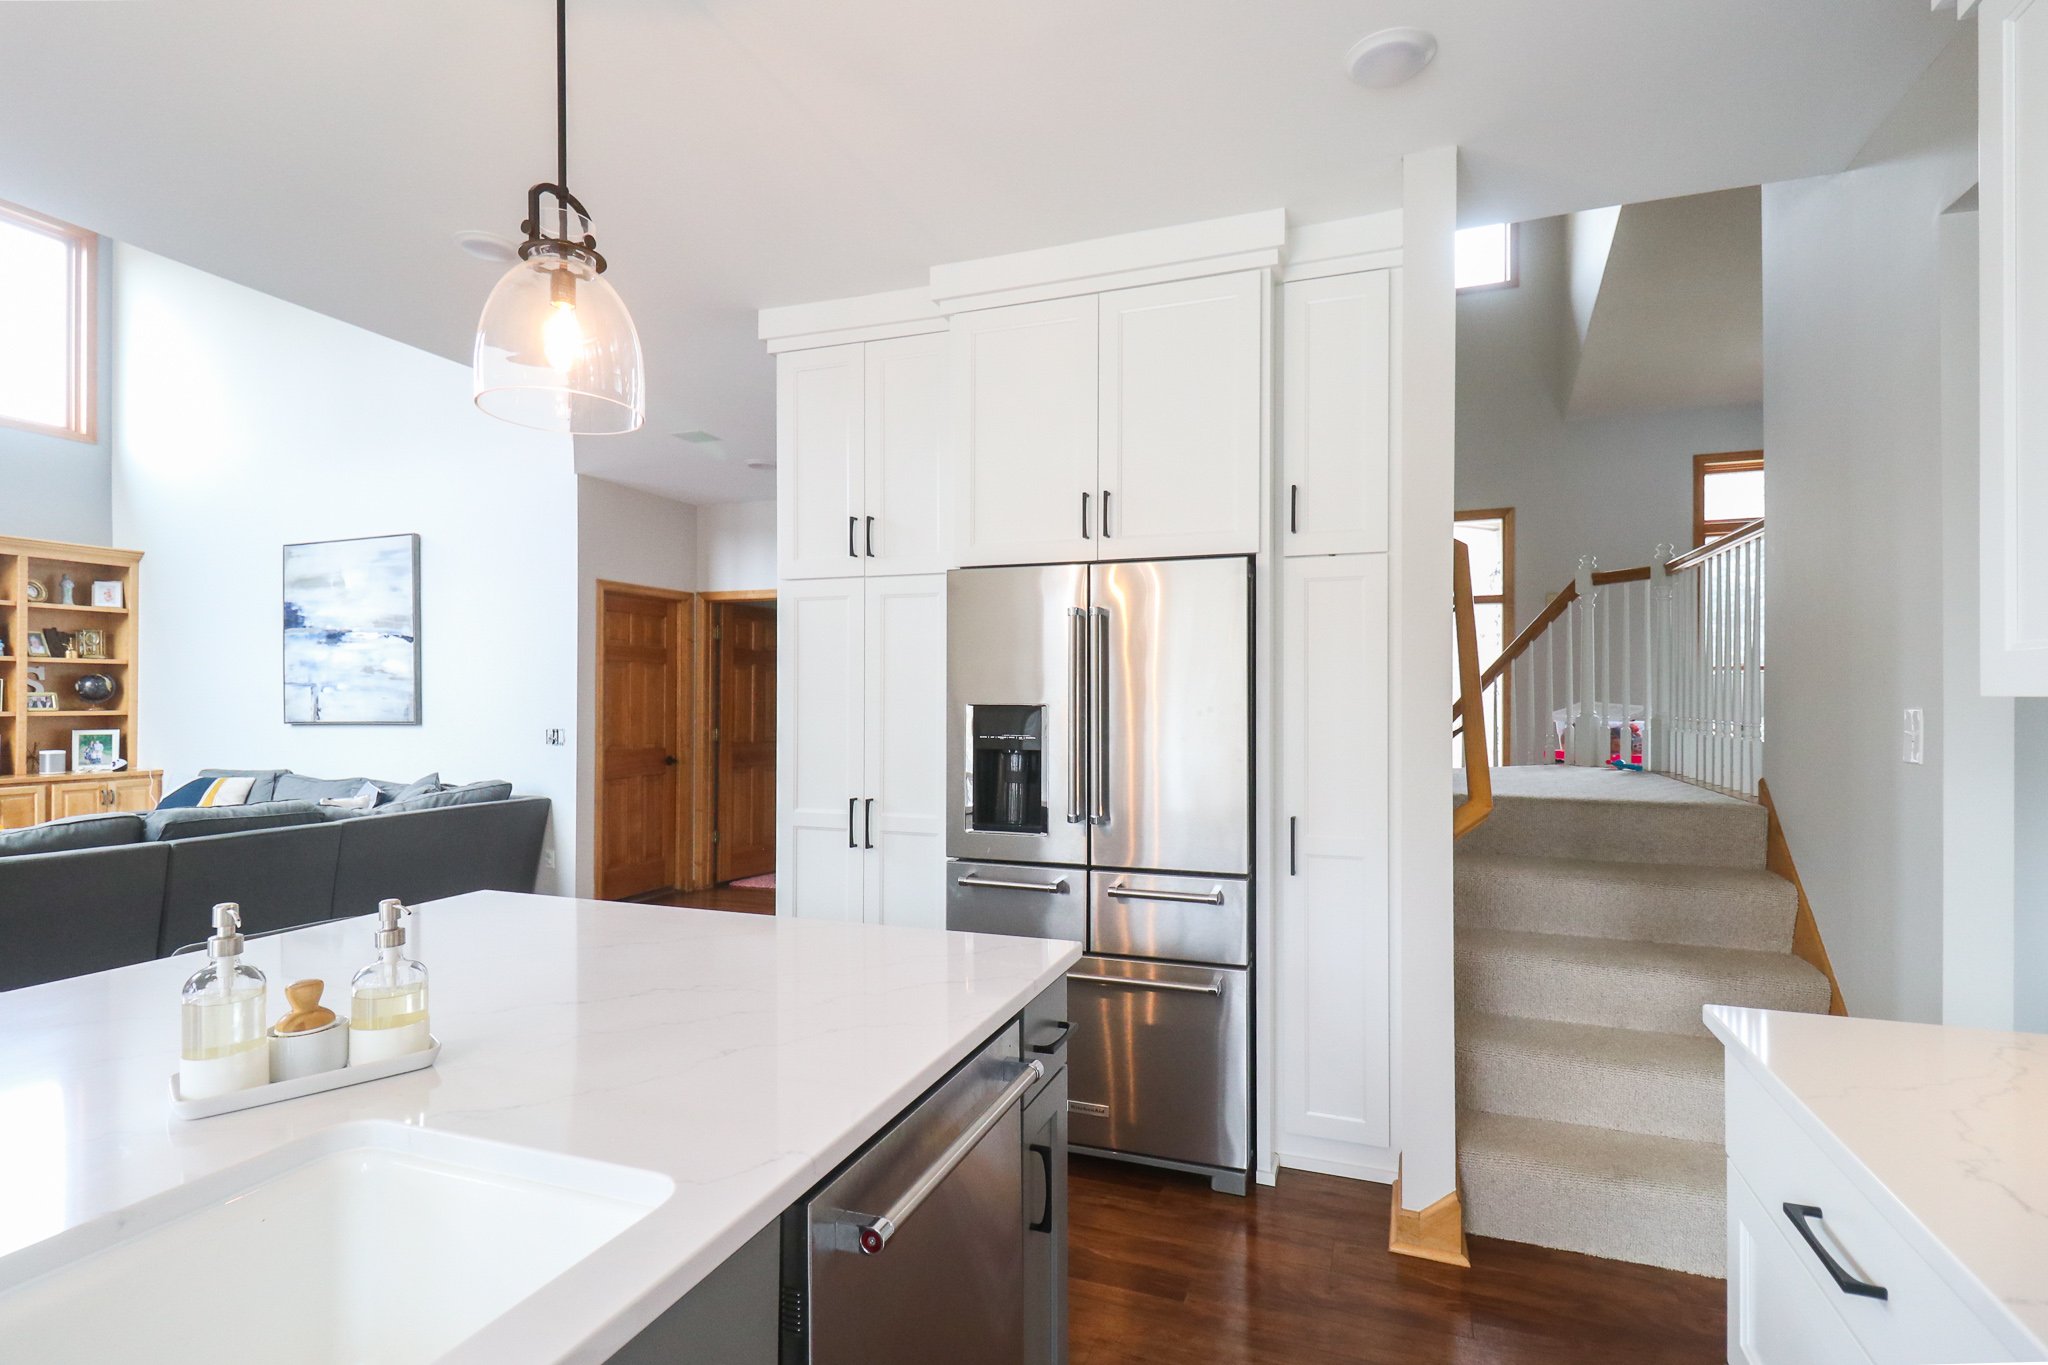
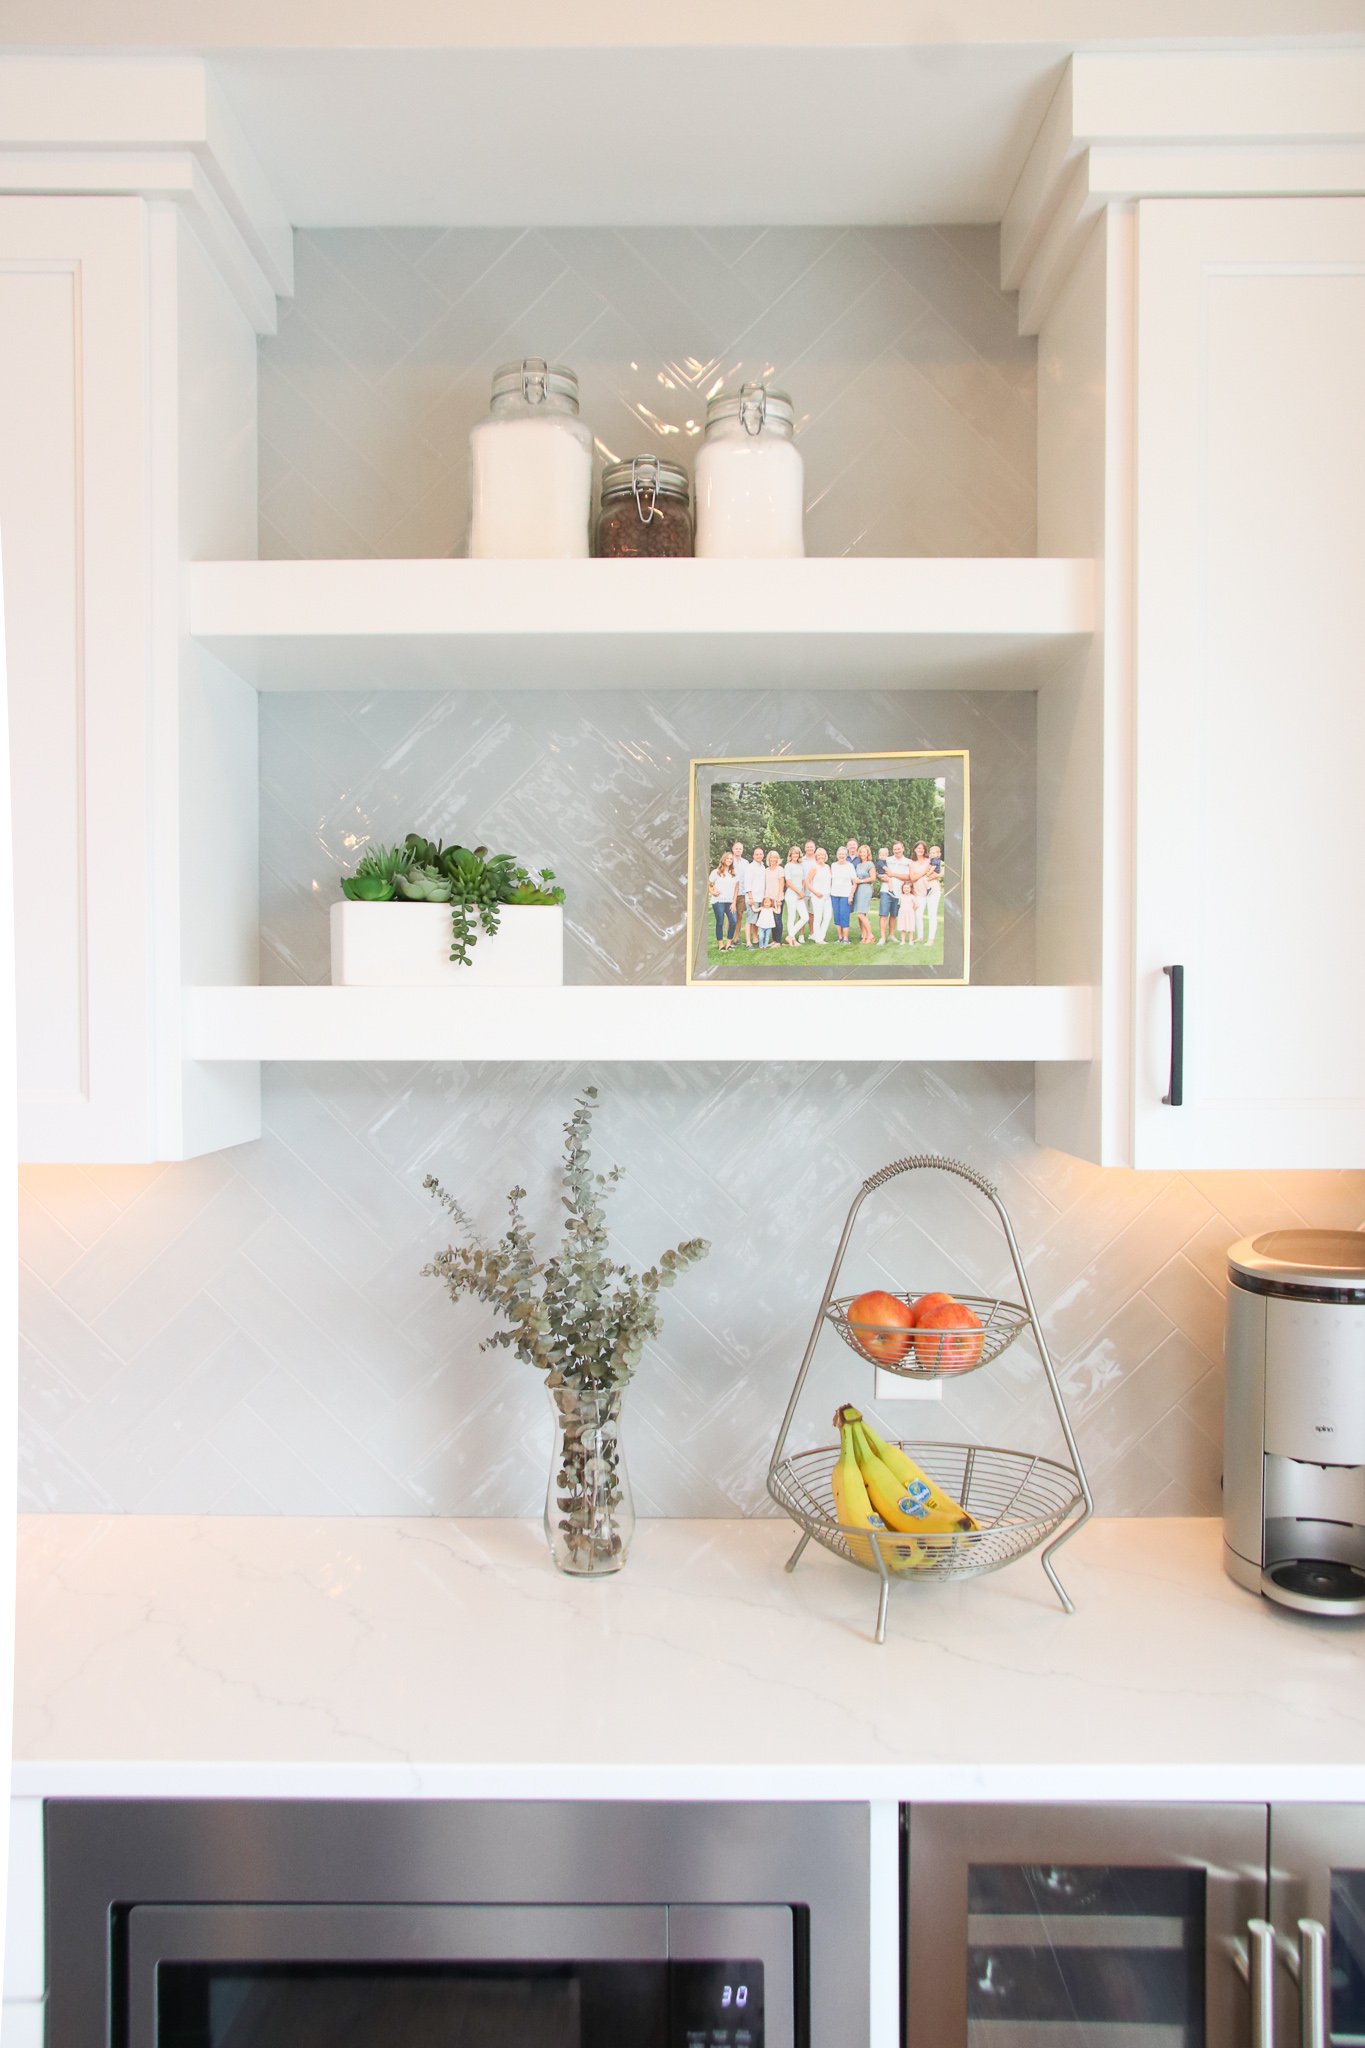
On the kitchen’s back wall, we lightened up the design both visually and structurally by getting rid of some upper cabinets. The addition of open shelving allows the space to breathe and makes it feel so much larger! Bringing the tile all the way to the ceiling also gives the kitchen a more custom look. We added a beverage fridge with glass doors and a built-in microwave to contribute to their vision of a clutter-free kitchen.

For the backsplash we selected a soft blue-gray tile with a light wave texture. We installed them in a double stacked herringbone pattern to further highlight the dimension of the tile texture. We love how clean yet intricate this looks!


Erin wanted to include a stove top and stainless hood that were minimal in design to show off the backsplash as much as possible. We also opted for a brushed nickel faucet to match the stainless steel appliances throughout. Another detail worth mentioning is the built-in spice rack we added near the stove!


Following the original kitchen’s layout, we kept the fridge on this wall and extended the cabinets to reach all the way to the ceiling. Because Erin and Bill don’t have a walk-in pantry, we installed these pull-out pantry shelves. This design allows for more storage because of the deep shelves, plus the sliding component makes it more accessible!


One of the challenges of remodeling is finding a balance between new and old. This was one of the concerns that Erin and Bill had when going with an all white kitchen. To tackle this concern, we decided to mix old with new by choosing some areas around the house to refresh with white while keeping the existing maple trim keeping everything consistent.

Stairs before

Stairs after

Stairs before

Stairs after

Thank you for following along with our before and after tour! We’ll be back soon with more.

Thank You Partners
We want to take a moment to thank our trade partners for making this remodel possible.
Tile: Minnesota Tile and Stone and Mark Lacey of Tile Star
Countertops: Granite-Tops (Cold Spring)
Cabinets: Scandia Custom Cabinets
Drywall/Paint/Stain: Brush Masters
Millwork (Trim/doors/windows): ABC Millwork & Cabinetry
Flooring: Renovation Systems
Electric: Jeske Electric
Plumbing: Integrity Plumbing
Lighting, plumbing fixtures & appliances: Ferguson Gallery
Are you ready to remodel?
For information and a consultation, contact Meg Jaeger, owner and chief creative of Mega Remodel, to see how we can make a plan for your next home remodeling project.